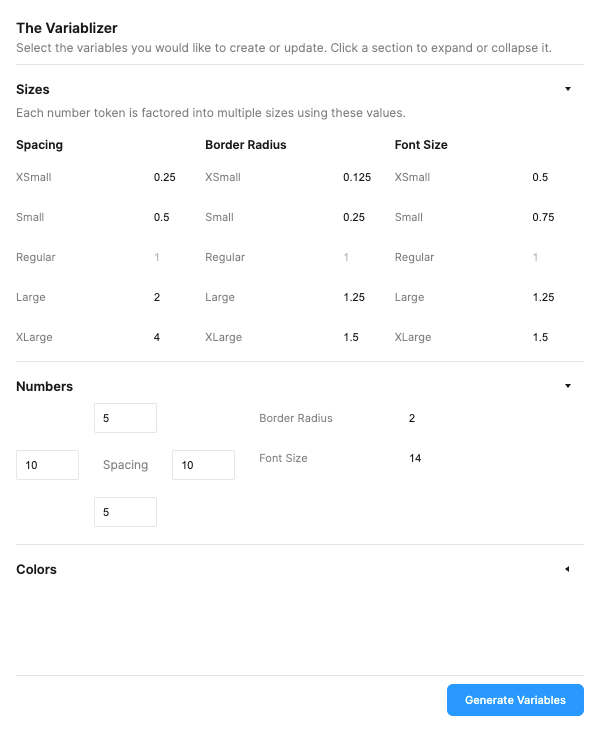
Mission Data uses Figma extensively for our UX design process. We kept hitting a bottleneck during project setup—each new client project required manual creation and customization of basic design elements like buttons and tables, with limited ability to supplant this from common shared libraries. To optimize this, we decided to leverage Figma’s Plugin API and the recently introduced variables feature and designed The Variablizer. It’s a custom plugin that enables us to create a range of property values based on pre-determined sizes. With properties such as font size, these variables facilitate the rapid creation of consistent design elements and allow for large-scale changes without manually adjusting individual elements.
This post discusses our technical choices and how we implemented them, and it also includes a few things we learned about working with the variable API.
The Setup
Since Figma itself uses Web technology, Figma plugins are written in JavaScript for their core operation, using a global figma object to manipulate the currently open file. The JavaScript runs in a sandboxed environment (the “scene”) that contains all of the standard ES6+ language features, but does not expose browser APIs. If browser functionality is necessary, a plugin can present a custom HTML user interface inside an iframe, where it will have access to browser APIs and can include custom styling and scripting. It’s important to note that the UI HTML file is subject to a few strict limitations:
- It is completely sandboxed, with no access to any part of the user’s filesystem.
- It has no access to the sandboxed JavaScript environment, including the
figmaobject. (Similarly, the scene cannot access any of the browser APIs within the iframe.) Interaction between the scene and UI must be done through messages. - It cannot request any outside resources—custom styling and scripting can be included, but it must be inlined within the HTML file.
More detail on the technical aspects of how plugins run can be found here.
The Stack
I settled on the following combination of technologies, loosely based on the Figsvelte template (created by Tom Lowry, a Design Advocate at Figma):
- Svelte for the user interface. I’d wanted to work with Svelte for a while, and the small scale of this project made it an ideal fit. Additionally, Tom Lowry released figma-plugin-ds-svelte, a set of Svelte components designed to match the internal design language of the Figma app.
- TypeScript for scripting to take advantage of strong typing. Figma provides very detailed type definitions for the entire Plugin API.
- Sass for styling. I chose Sass over PostCSS because the latter can be very fiddly to configure and Sass simply works almost all of the time.
- Rollup to bundle everything up. The svelte-preprocess package enables us to use TypeScript and Sass within our Svelte components. It’s also necessary to use the HTML plugin to generate an HTML file which will serve the Svelte bundle.
Ordinarily I would have included Tailwind CSS as well, but elected not to because figma-plugin-ds svelte already provides a small-but-useful collection of utility classes, and it was simply easier to augment those.
The Process
Creating the UI
In general, the components provided by figma-plugin-ds-svelte work well and are easy to compose. However, I had to purposely override a few of them because of limitations which were only evident after reading the source. For instance, the Input component (used to create text inputs) didn’t allow me to specify a type attribute, and it didn’t appear to properly emit a change event for situations where I didn’t want to use auto binding.
To manage communication between the UI and the plugin I settled on a Redux-style approach, using predefined constants to name variables and adding reducer-like switch/case statements to both plugin and UI. With a little TypeScript magic, we can add strong typing to ensure messages are valid.
// constants/messages.ts
// Redux-style event names
export const GET_VARIABLES = "GET_VARIABLES";
export const SET_VARIABLES = "SET_VARIABLES";

// This one weird trick generates a mapped type of all exported constants.
type ConstantsMap<T extends { [key: string]: any }> = { [K in keyof T]: T[K] extends Function ? never : K };
type AllConstants = ConstantsMap<typeof import("./messages")>;

// Here we create a type that represents any possible export from this file,
// and define our message structure.
export type MessageType = AllConstants[keyof AllConstants];
export interface MessageContent<T> {
  type: MessageType;
  content: T;
}

// This interface ensures we match the message format expected by Figma.
export interface MessageEvent<T extends unknown> {
  data: { pluginMessage: MessageContent<T>; };
}
Here is a complete example of the message passing at work:
<!-- App.svelte -->
<script lang="ts">
  import { onMount } from "svelte";
  import { SET_VARIABLES } from "constants/messages";
  import type { MessageContent } from "constants/messages";

  onMount(() => {
    parent.postMessage({ pluginMessage: { type: "GET_VARIABLES" } }, "*");
  });

  onmessage = ({ data: { pluginMessage } }: MessageEvent<unknown>) => {
    if (!pluginMessage) return;
    switch (pluginMessage.type) {
      case SET_VARIABLES:
        const { content } = pluginMessage as MessageContent<any>;
        break;
    }
  };
</script>

<!-- code.ts -->
<script lang="ts">
  import { GET_VARIABLES, SET_VARIABLES } from "constants/messages";

  figma.ui.onmessage = async (message: MessageContent<unknown>) => {
    switch (message.type) {
      case GET_VARIABLES:
        figma.ui.postMessage({
          type: SET_VARIABLES,
          content: {} // Load variable data here
        });
        break;
    }
  };
</script>
Managing Data
To track data entered into the UI, I used Svelte’s built-in stores, which are a breeze to work with. Other popular store management packages such as Redux or Vuex require you to dispatch events or call special methods to change the content of a store. Technically, Svelte requires you to call subscribe and unsubscribe methods to activate a store, and then update to change it; however, it provides a clever abstraction which allows you to treat a store as if it were a simple variable:
// stores.ts
import { writable } from 'svelte/store';
interface Store {
  propOne: number;
  propTwo: number;
}
export const storeOne = writable<Store>({ propOne: 0, propTwo: 0 });
export const storeTwo = writable<Store>({ propOne: 0, propTwo: 0 });

<!-- Component.svelte -->
<script>
  import { storeOne, storeTwo } from './stores';
  // this is the standard way of getting a store value into a component
  let storeOneValue;
  const unsubscribe = storeOne.subscribe((value) => {
    storeOneValue = value;
  });
  // prepending a `$` to the store object will instruct Svelte to perform
  // several transforms on it which instruct the component to automatically
  // subscribe and unsubscribe to the store. We can reference storeTwo
  // within the template using `$storeTwo`.
  function setPropOne(value) {
    // manual subscription requires calling `update` with a callback
    storeOne.update((value) => ({
      ...value,
      propOne: value
    }));
    // auto subscriptions automatically call `update` when "written" to.
    // nested properties can be change directly as well.
    $storeTwo.propOne = value;
  }
</script>
Combined with Svelte bindings, capturing numerical values from the UI is trivial:
<script>
  import { Label, Input, Type } from "figma-plugin-ds-svelte";
  import { settings } from '@stores';
</script>
<div class="structural">
  <div class="center">
    <Type size="small">Spacing</Type>
  </div>
  <div class="top">
    <Input type="number" borders placeholder="px"
            value={$settings.numbers.spacingTop} />
  </div>
  <div class="left">
    <Input type="number" borders placeholder="px"
            value={$settings.numbers.spacingLeft} />
  </div>
  <div class="right">
    <Input type="number" borders placeholder="px"
            value={$settings.numbers.spacingRight} />
  </div>
  <div class="bottom">
    <Input type="number" borders placeholder="px"
            value={$settings.numbers.spacingBottom} />
  </div>
</div>
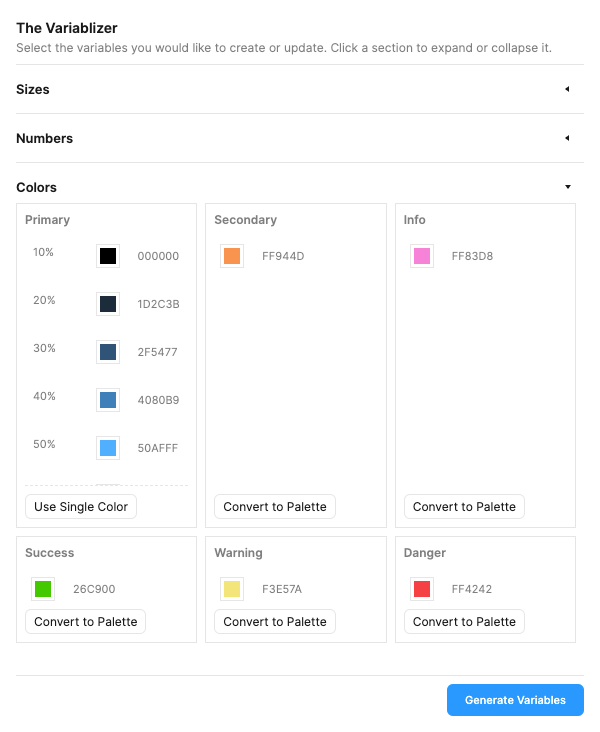
Handling Color Data
Color values stored in Figma variables are in RGBA format, with an important caveat: the r , g and b values are based on a scale of 0–1 (where zero is black and one is white).
For the UI I ended up implementing svelte-awesome color-picker, which supports component overrides for deep customization; this allowed me to create a color picker that closely resembles the one found in Figma. Unlike Figma, when working with RGBA the color picker expects the r , g and b values to be based on a more traditional scale of 0–255, which more closely matches CSS. So it was important to include a translation layer when passing RGBA values between the plugin and the UI.
| Usage | Format |
|---|---|
| Figma variable | { r: 0.5294, g: 0.8078, b: 0.9216, a: 1 } |
| Svelte color picker | { r: 135, g: 206, b: 235, a: 1 } |
Additionally, the color picker includes the ability to directly input colors in hex or HSV formats, so changes to these fields had to be transformed back to RGBA. The colord library (which svelte awesome-color-picker requires as a dependency) was essential for this.
Working With Variables
In the plugin code, the figma.variables object holds all methods related to creating and updating variables. Since this feature is relatively new, it is not especially well-documented, and working with it can feel cumbersome. In this section of the post I’ll discuss some of the quirkier and more confusing aspects. Note that it’s possible (and probable) some of this may change in the future.
Most Properties Are Defined Using Getters
A requirement of the plugin was that it should check the current file for pre-existing variables, and import their values into the UI if found. Requesting the variable data via a message was easy enough, but when the UI received that result the Variable objects within only contained the id property, and all other properties had been discarded!
It turns out most of the properties on Variable are defined using getters, meaning they are not immediately evaluated. To prevent errors and security warnings, our collection of variables is serialized prior to sending the return message; as part of this process, all methods are removed because the contents of figma.ui.postMessage cannot contain any functions. Since the getter properties had not been fully evaluated, they were considered to be functions, and subsequently removed.
The solution was to map over the results and return objects where all necessary properties are purposely called, ensuring that static values are present within the resulting objects.
The Importance of IDs
Variables and variable collections can have names, but these are largely decorative—all interactions with both are done via IDs (likely so users can easily change the names later without breaking existing references). Creating a new variable requires a collection ID, so make sure you have it available.
Variable References Must Be Fresh
At one point, I tried to optimize variable lookup by using the SET_VARIABLES event to build an object of variables using their names as keys. This led to some frustrating experiences later where I would look up one of these variables and modify it, only to find those changes didn’t actually appear in the file itself. The only reliable way to get a current reference is to either:
- Call
figma.variables.getVariableById()if you have the variable ID. - Call
figma.variables.getLocalVariables().find()and search the collection if you only have the name.
Setting Values By Mode
Variables don’t hold a single value:
- Each variable belongs to a variable collection.
- Each variable collection has one or more modes.
- Therefore, each variable in the collection must have a value for each mode.
The intention here is to reflect themes such as light and dark, so it’s more appropriate for colors than anything else. But numeric variables also must have mode values, even if the value will be the same for all modes. So when we create or update a variable, it’s important to ensure values are set for all available modes.
The current values for each variable are defined in a readonly collection called variable.valuesByMode ; to actually change it, you need to call variable.setValueForMode with the new value and the ID of the mode to set it to. If your file is using multiple modes, be sure you loop through all of the mode IDs.
The Sum Up
The Variablizer was born out of a need for a solution that would save time during the initial stages of design in Figma. Turns out the Variablizer has become an invaluable asset to our team at Mission Data. It’s not just a tool; it’s a testament to our dedication to delivering top-notch design work efficiently. We hope that sharing our technical choices, implementation process, and insights will inspire others to explore the possibilities that Figma offers and discover innovative ways to enhance their design workflows.