Cybersecurity is an important topic in our life. We hear about hackers stealing sensitive information and credentials from users. Hackers can leverage the weak spots left from the development lifecycle or misconfigurations in production environments.
Even though we have hackers exploiting vulnerabilities, we have people in the software testing industry working to prevent those kinds of attacks before we deliver the software application to the end-user.
This blog is going to propose open-source tools from the OWASP Software Security Community that development teams can implement along with Jenkins in CI environments. These tools can find vulnerabilities in the third-party dependencies and find relevant information on how to avoid or mitigate those vulnerabilities.
Dependency Track
OWASP Dependency Track is a tool that can centralize all the dependency vulnerabilities scanned to check if a vulnerability is affecting one or more projects registered in the tool. We also have several dashboards displaying metrics about how many vulnerabilities we have in our projects, the amount of vulnerable projects and some other important metrics. Dependency Track can be used in combination with Dependency Check and Jenkins to generate the XML required for Dependency Track. This feature double checks the dependency vulnerabilities of a project, updates metrics and dashboards and automatically sends those XML files from the Jenkins Server to the Dependency Track server through API using the Dependency Track plugin and configuration in Jenkins feature. It’s really important to mention that we can send Bill of Materials instead of XML files from Dependency Check analysis such as CyclonDX or SPDX Bill of Materials removing Dependency Check from the equation.
Installing Dependency-Track plugin in Jenkins
Dependency-Track is not difficult to install in Jenkins steps to achieve it as follows:
- As Jenkins Admin, go to Manage Jenkins -> Manage Plugins
- Select Available tab and then search for OWASP Dependency-Track.
- Install and Restart Jenkins.
- After Jenkins restarts, a new section named Dependency-Track will be displayed in Jenkins configuration. The steps to perform the connection between Dependency-Track and Jenkins will be described in the Dependency Track -> Connecting Jenkins with Dependency Track section.
Configuring Dependency-Track server
This outstanding tool has several ways to be deployed and configured. The easiest way is to pull the docker image and create a data volume. Afterward, create a docker container. Instructions on how to create the docker volume and docker container can be found in the following reference: https://docs.dependencytrack.org/getting-started/deploy-docker/
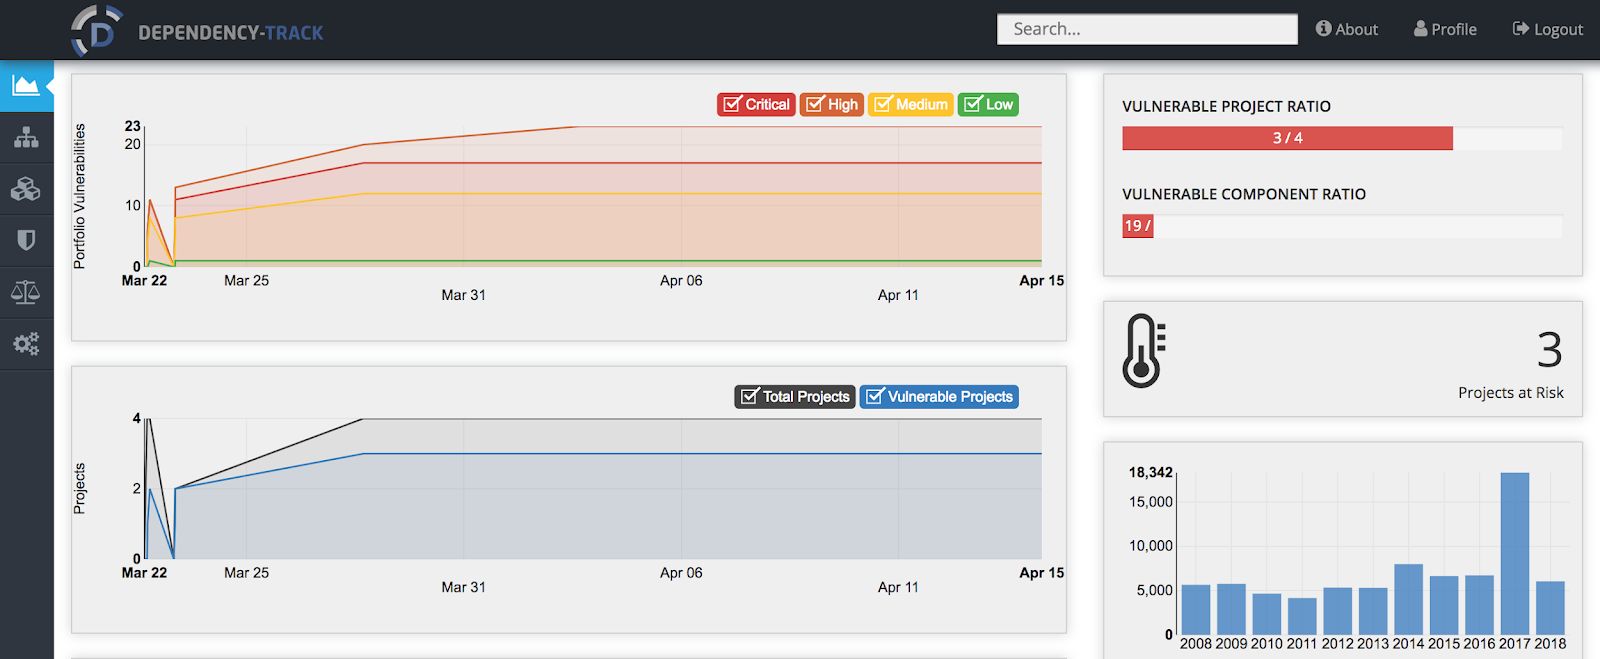
General Dashboard
In the general dashboard of the Dependency-Track server, we can find some relevant information like how many projects we have registered in the tool and how many of them are vulnerable. The amount of vulnerabilities discovered displayed in the Portfolio of Vulnerabilities chart will update based on the fixes,updates we apply to our dependencies or if there are new vulnerabilities discovered for our actual portfolio of third party dependencies divided based on severity based on a CVSS v3 score. Also, we can check the total amount of software components we have against the amount of them that are vulnerables in another chart.
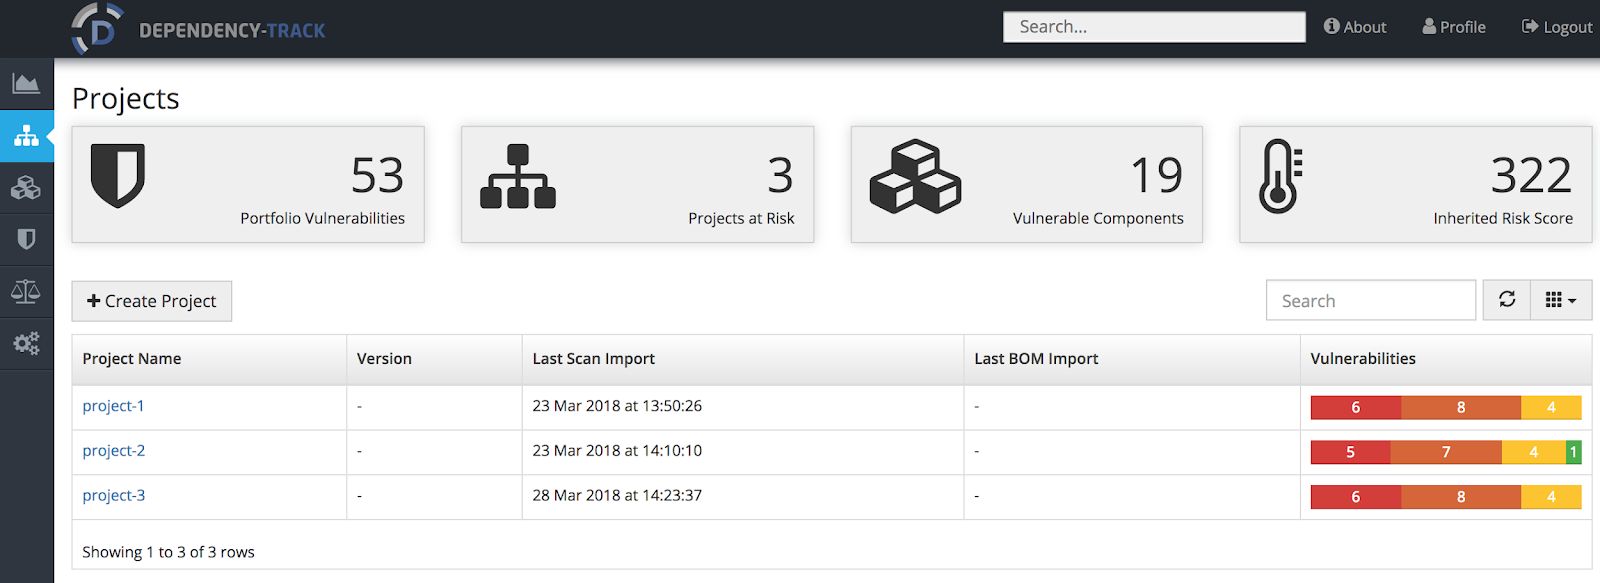
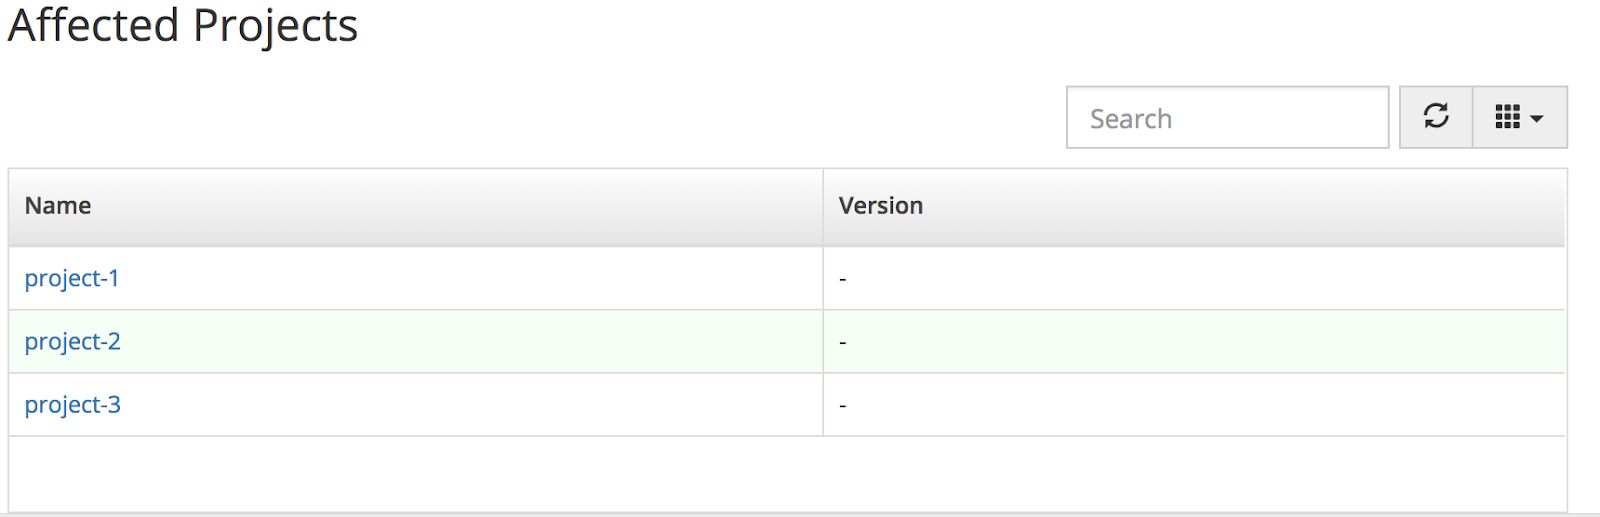
Projects Area
In this section of Dependency-track, we can review existing projects or create new projects in order to match them with the projects we are building in. This keeps track of the vulnerabilities per project and the amount of vulnerable components we have per project.
Vulnerable components
Vulnerable components offer several relevant information regarding how many vulnerabilities each component has grouped by severity based on CVSS v3 scoring system. Each vulnerability has its information based on the NVD locally, but you can access each CVE either from Dependency track or from the internet using the URLs in the vulnerability information as follows:
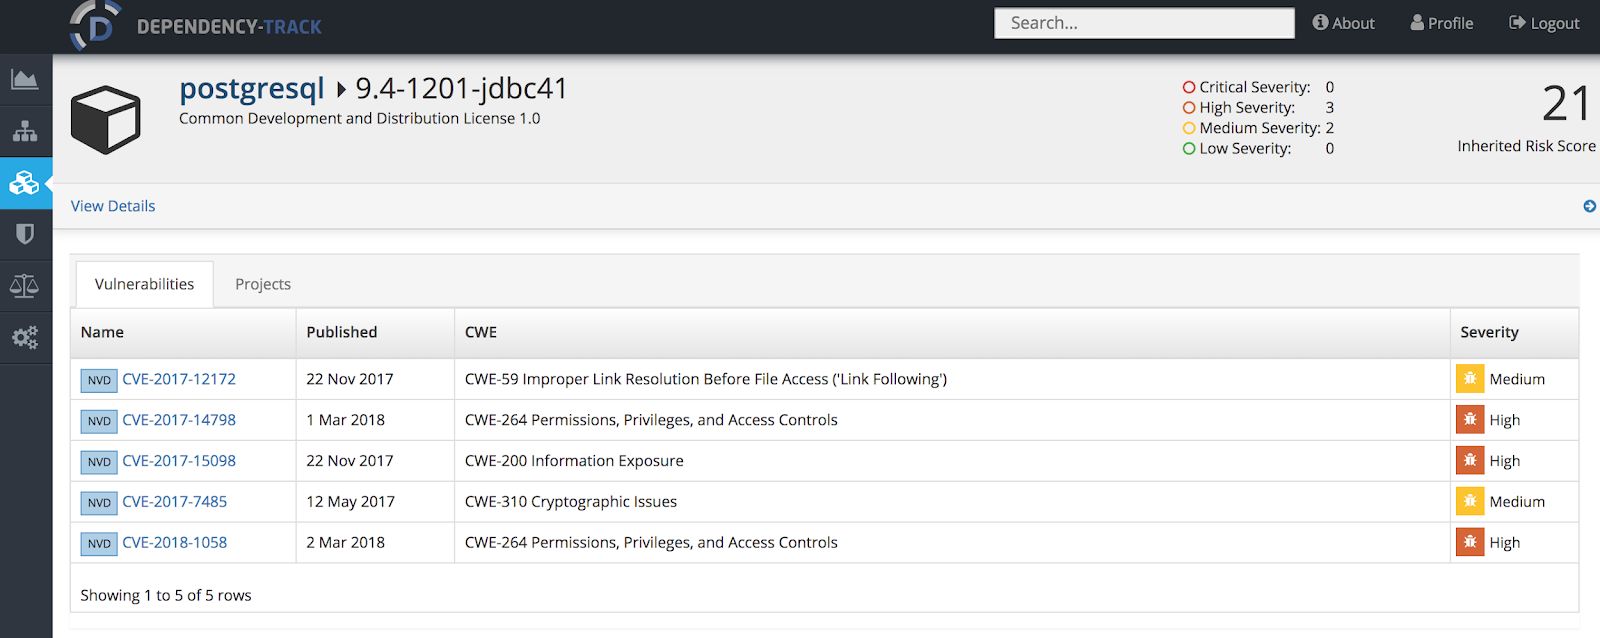
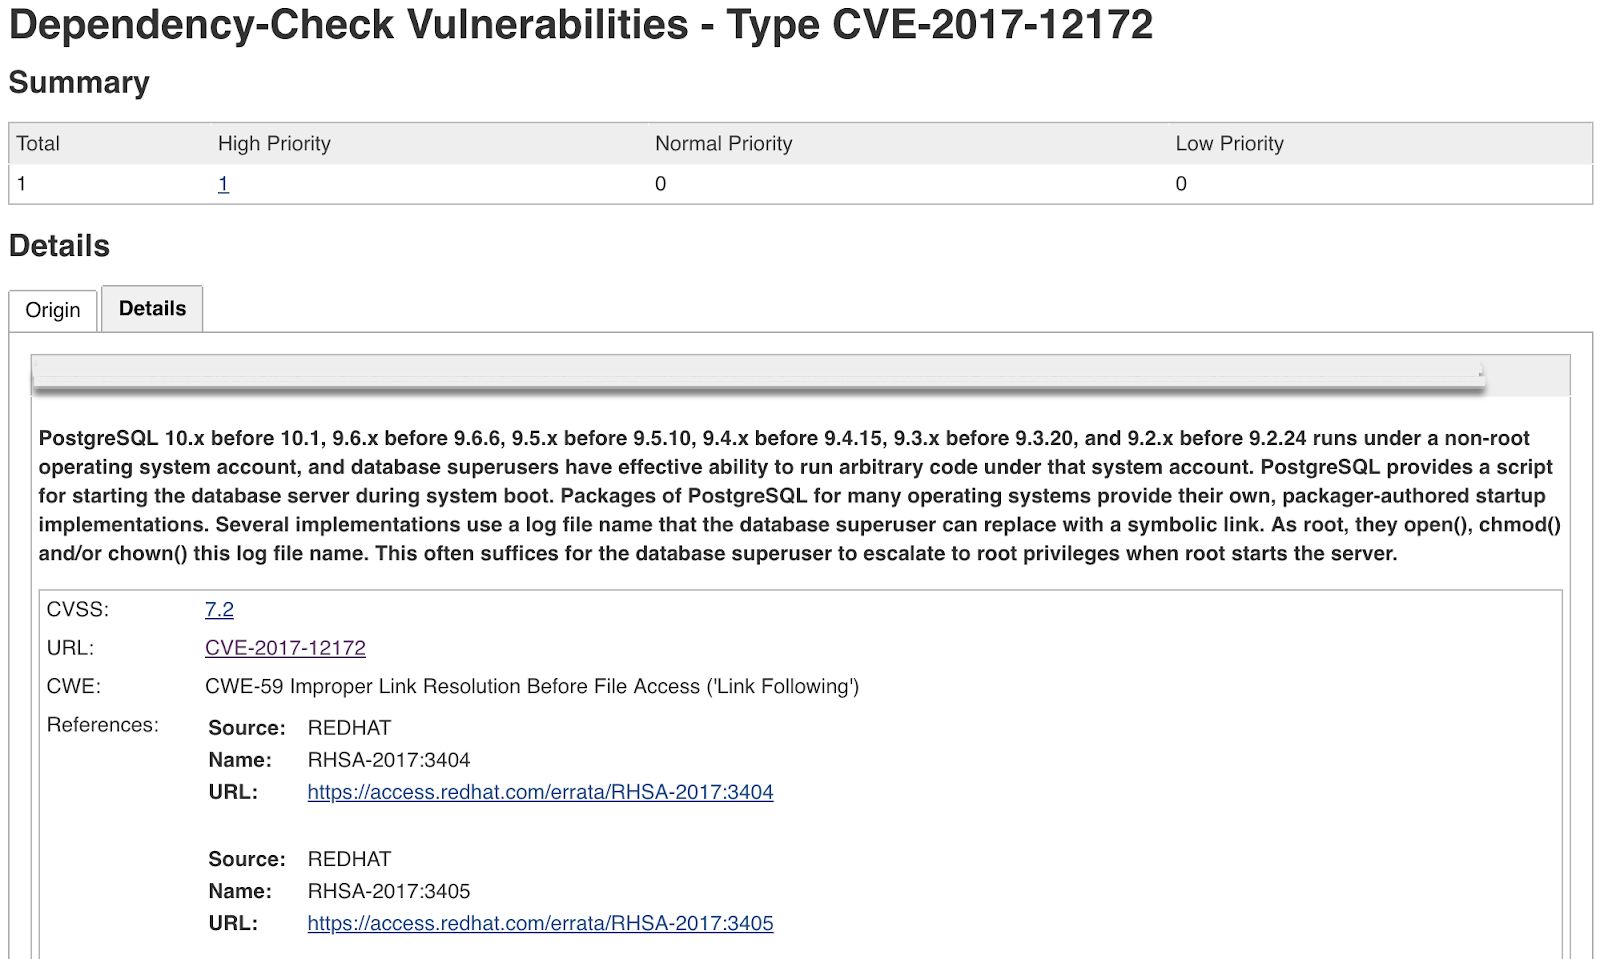
Accessing each CVE provides relevant information of the vulnerability itself as described in the next image:

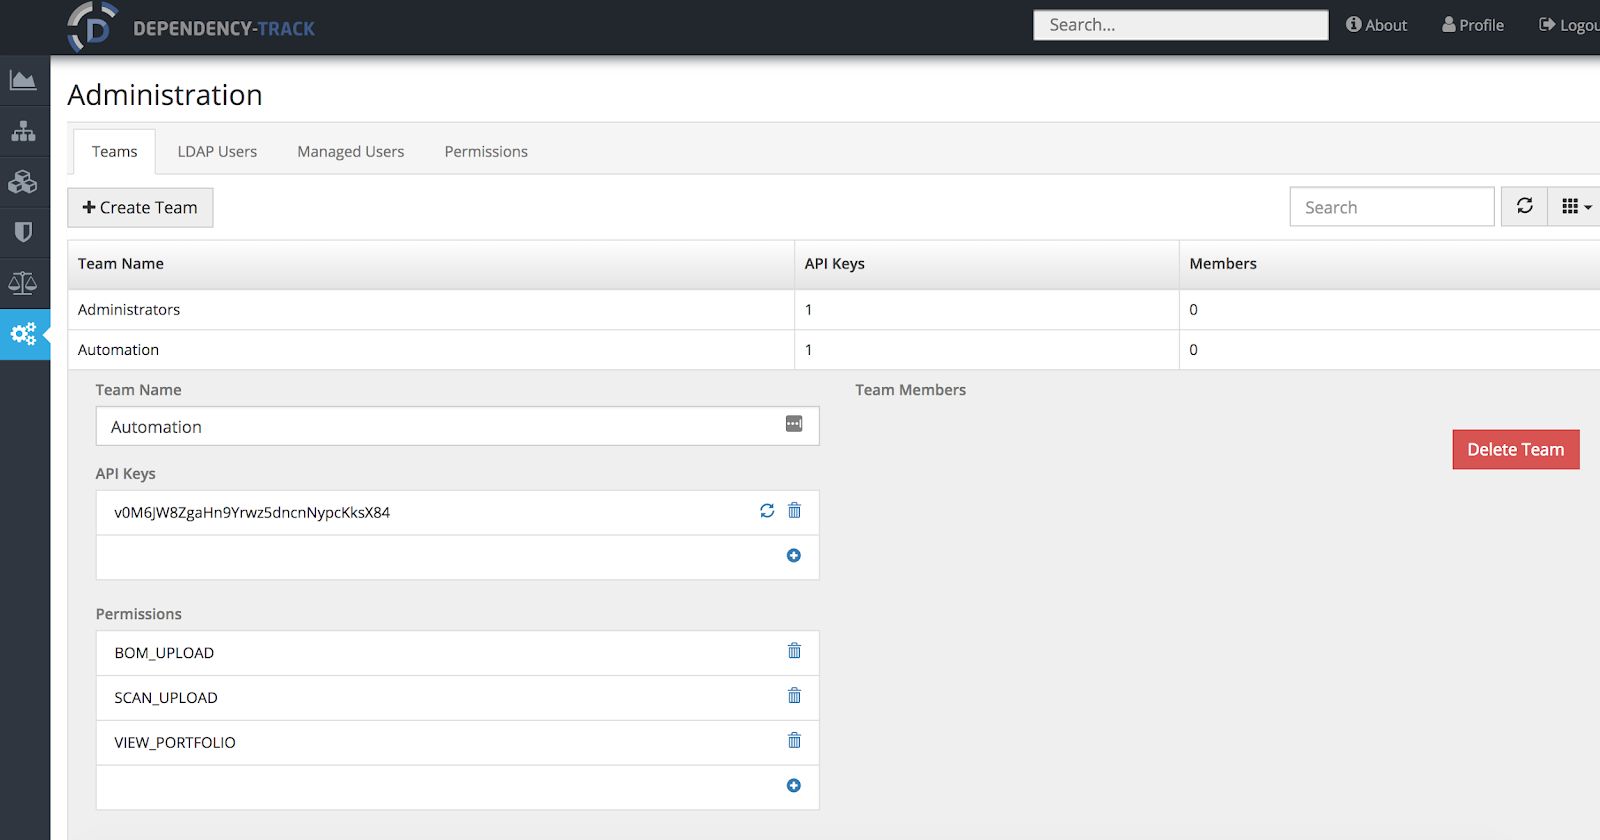
Dependency-Track API Key
Accessing the Administrator area, a user can set several features for this powerful tool including managing users and permissions and generating API Keys by permission group so that access through the API Key is restricted on our expectations and restrictions provided. API Keys can be generated by selecting a Team in the Administrator panel. Afterward, we can do several actions in the Keys section including regenerating the existing key for a team, generating a new key or adding a new key to the one that already exists to manage separate access to third-party tools like Jenkins.
Connecting Jenkins with Dependency-Track
As mentioned in the section above, Dependency Track can generate API Keys to let other tools establish connections with the Dependency Track server. In the case of Jenkins, we can connect to the Dependency Track server adding the URL address of the server and the API Key in Manage Jenkins > Configure Jenkins > Dependency-Track section at the end of the Configure Jenkins area. By doing this step, we will have the option to set the Dependency-Track project we want to send the metrics or the bill of materials to. By having that feature configured, we can have the information about the vulnerabilities found during the building process in the Dependency track server.

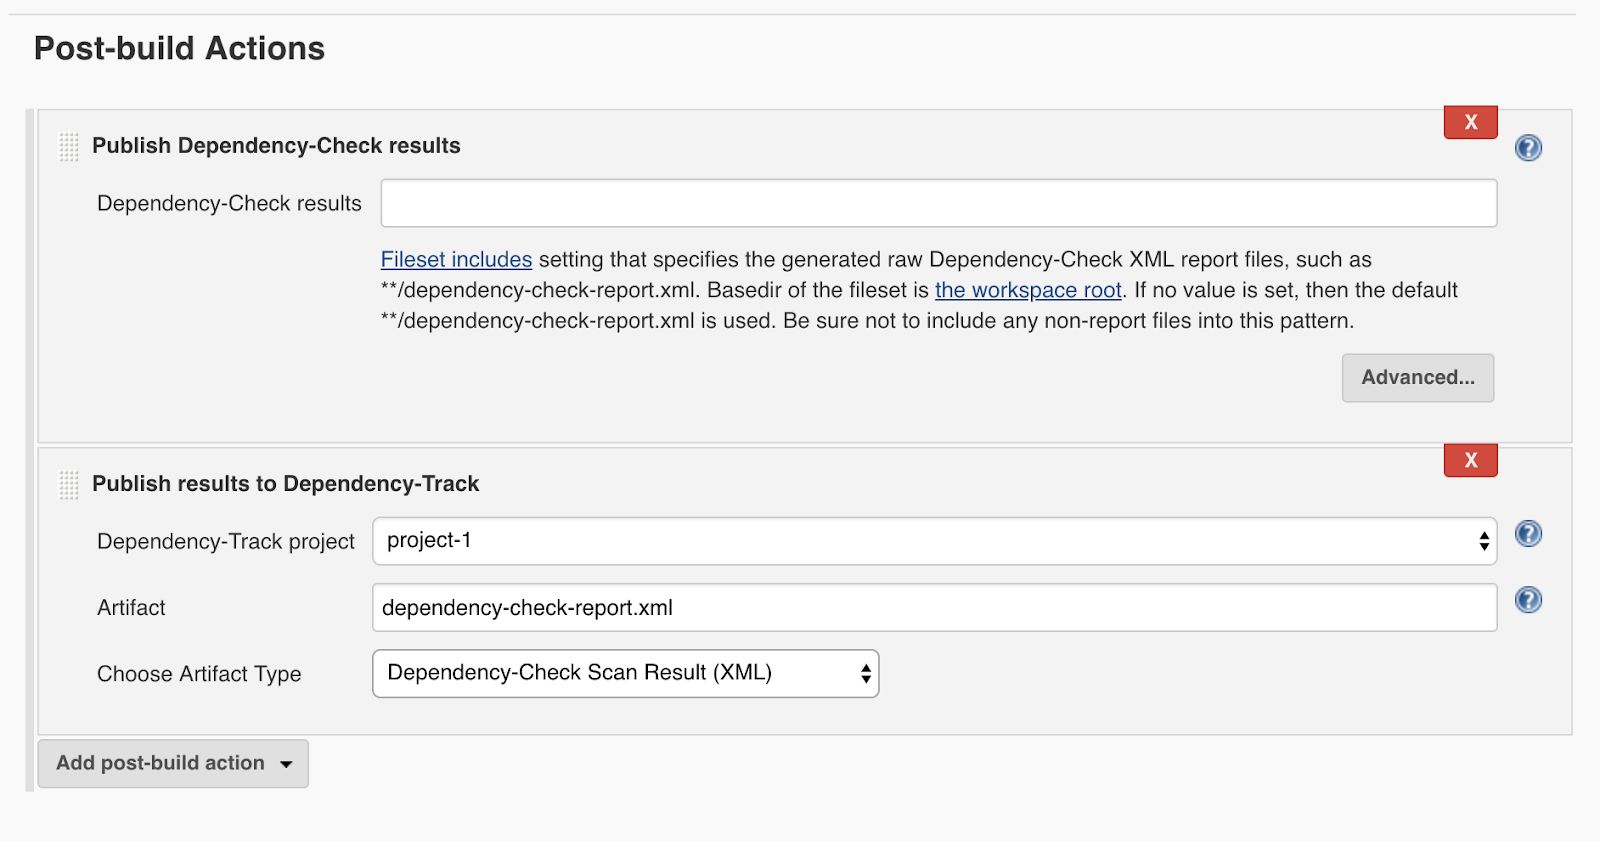
After a successful connection with Dependency-Track server is established, we will have the option in the Jenkins job to export either bill of materials form CycloneDX, SPDX to Dependency-Track server or to send the XML resulting from Dependency-Check analysis as follows:
Dependency Check
OWASP Dependency check is a dependency checker tool that scans software in the building process. This tool can be applied as a Maven plugin or Jenkins plugin in a Jenkins CI Building and/or deployment Job, or as a CLI tool. These tools can scan specific paths containing third party dependencies. For this blog’s purpose, we are going to implement a Dependency Check as a Jenkins Plugin to scan dependencies in a CI building process. The required steps are described in the following:
Installing Dependency Check in Jenkins
Dependency Check is easy to install in Jenkins. To do so, use the steps listed as follows:
- As Jenkins Admin, go to Manage Jenkins -> Manage Plugins
- Select the Available tab and then search for OWASP Dependency Check
- Install and Restart Jenkins
Adding Dependency Check step to scan in building job
Assuming that we already have a freestyle building job to build a maven project, we should add the following steps in the building process:
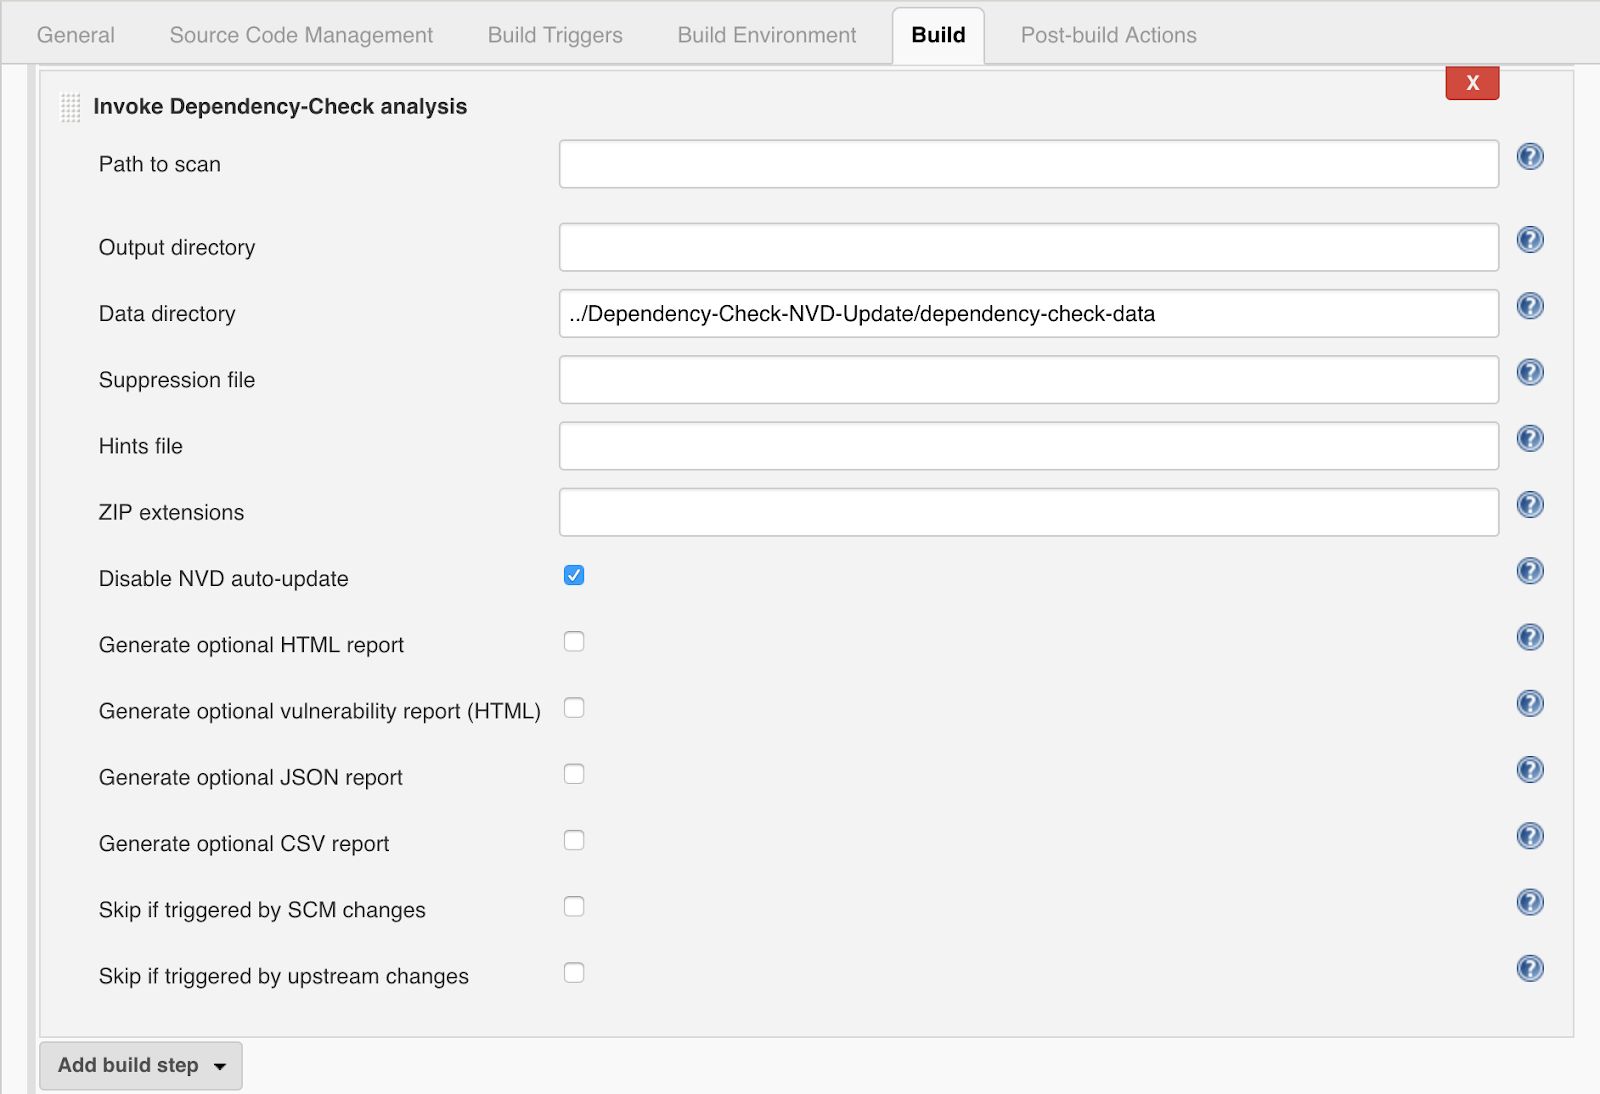
- In the Build area, add a new build step named “Invoke Dependency-Check analysis”
- If you left the text box as blank, then the dependency-check will analyze the current working directory.
- In “Advanced” options of the building step previously created, there are several options to configure the analyze process. It’s highly recommended that you move the auto-update for the NVD, and create a separate job to update a National Vulnerability database copy. It could be updated every 4 hours or days depending on the building requirements. This is going to reduce execution time in the analyze step for dependency check. Moreover, it is required to specify the path of the NVD in the Data directory. Also, disable the NVD auto-update.

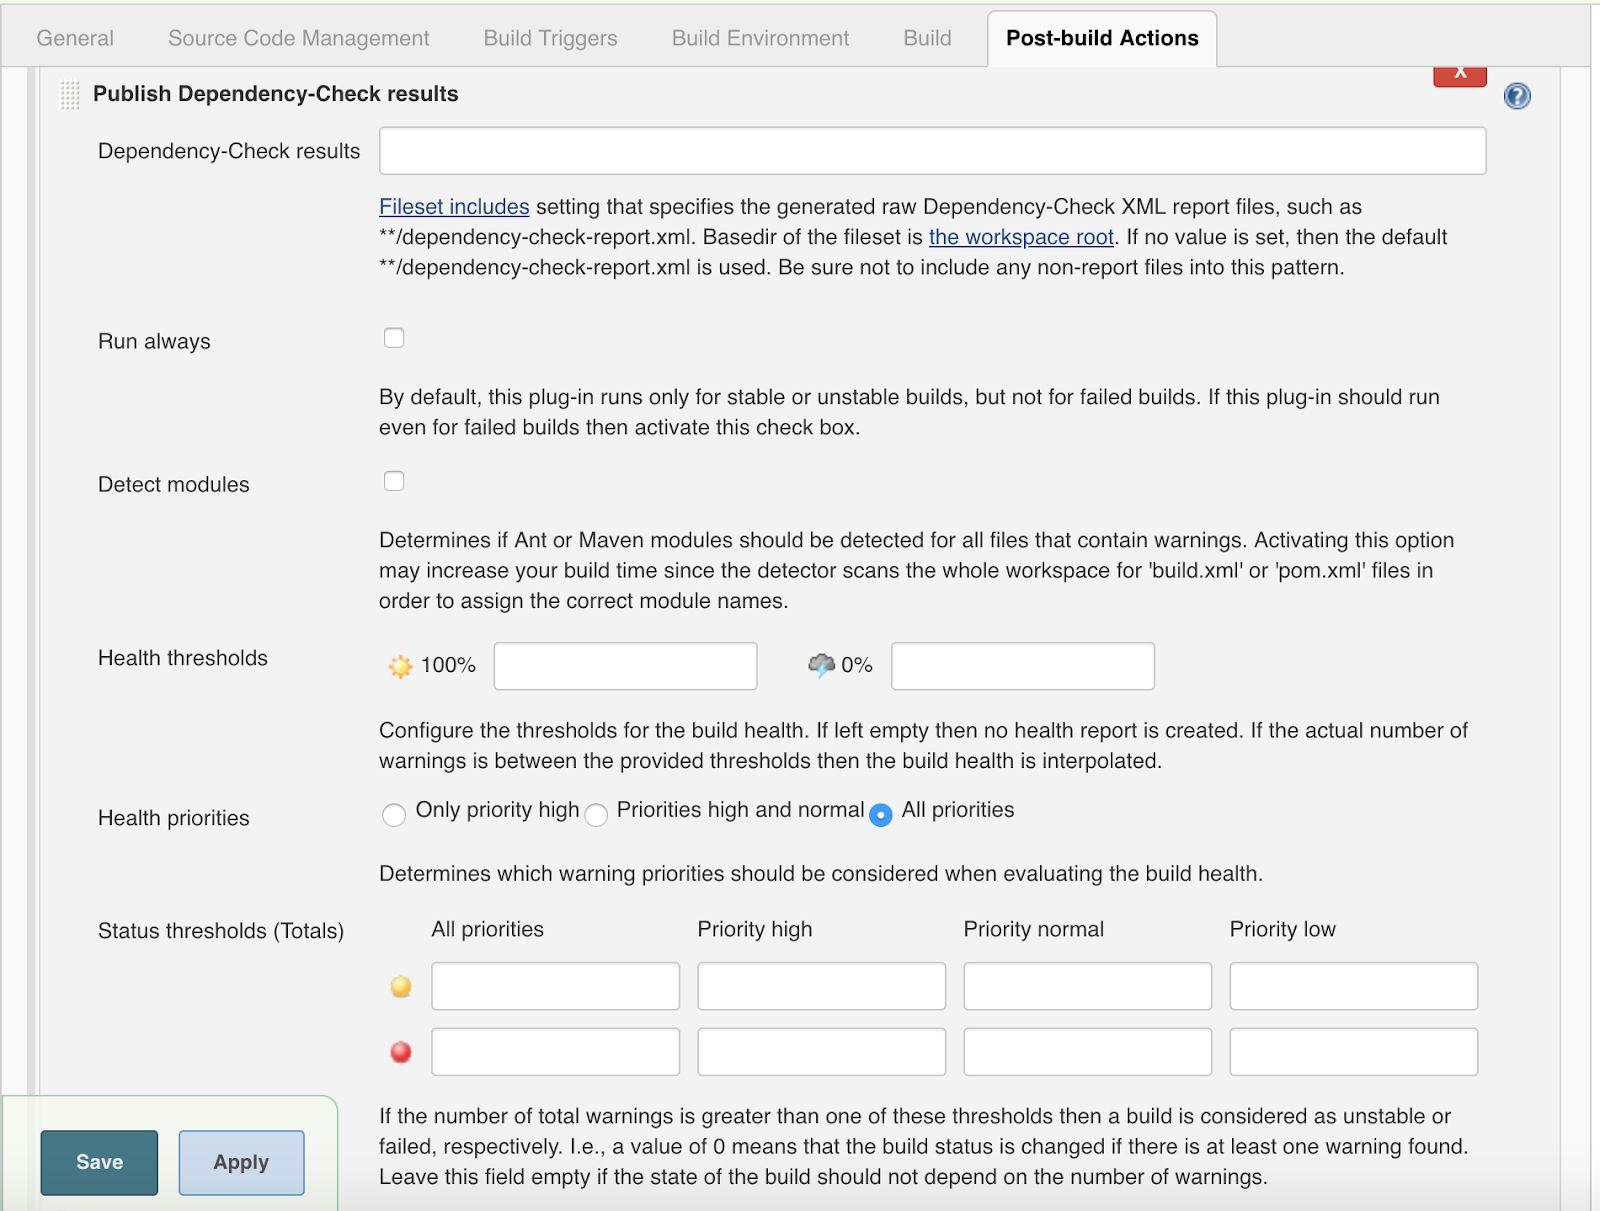
- In the Post Build area, add a new step with the name “Publish Dependency-Check results.” To create the XML report with the results of the dependency analysis, some options could be configured in this area such as:
- Dependency-Check results text field: if left blank it will write the test result in the working directory with a default name.
- Status thresholds (Totals): A user can define the threshold for build failure, or warn depending on the number of vulnerabilities found in the scanning process. Also, the user can define different thresholds based on the severity and amount of vulnerabilities found.
Interpreting results in a Dependency Checker Tool
After the building process, there is a section named Dependency-Check Vulnerabilities inside the build. This new tab is going to present the final result of the vulnerability verification for the project including the following information:
- Total number of vulnerabilities found
- Number of vulnerabilities found by severity based on CVSS v2.0

- For each vulnerability, we have the CVE and some relevant information about the vulnerability based on NVD.
Conclusion
As regular users, we spend a lot of time in the cloud. We search for information sharing data and do other actions that store or publish sensitive information. As developers, we should ensure that our software is secure so that other users can use it with confidence. From a business standpoint, it is always better to find security gaps during the development stage of a software project to fix actions accordingly without affecting the final user. Having some of the tools mentioned in this article implemented in our daily integration process would help us increase the security and quality of the product. We satisfy users and we stay a step ahead from possible attacks by closing these attack vectors before they get exposed to the cloud.