“Delorean.” That single word makes you think of a time machine and an unimaginable number of possible time travel destinations. Watching Jordan in the 91’ finals against Magic Johnson? Done. A seat on the 1964 Ed Sullivan Show to watch the first live appearance of The Beatles in the US? You got it! A time machine allows you to move from one era to another. So many crazy possibilities! But crazy possibilities are not something we like to deal with when it comes to software development. We want to control – plain and simple. Being able to delimit all the possible inputs on a system and knowing how to respond to any possible output is the core design function of a software piece. So, we invented the matrix; well, kind of.
Remember that scene in The Matrix where Neo finally meets the Architect in a room full of TVs? Each TV displays one of Neo’s next possible reactions. All of his emotions were coded, expected and handled, thus “part of the program.” So, the Matrix was a machine able to manage all of Neo’s states of mind. And this what we call a state machine.
What is a state machine?
Put simply, a state machine is a program that delimits every possible state of an object. And what happens when the object moves to a new state – this is when an event alters the state of the object. The state machine defines which states and events are valid on a given object, thus simplifying enormously the task of controlling it; anything outside the white-listed values will be discarded.
An easy example to help you visualize this is water. If we apply heat to liquid water (event), we get to a new state: vapor. If we freeze liquid water, we get ice. If we apply heat to ice, it melts and we get liquid water again. So we have a couple states here: liquid, vapor, ice. And we also have some events: vaporizing liquid water, freezing liquid water and melting ice. If we continue developing this schema we get something like this:
Here we have a state machine with four states, and 8 possible events that will take our object from one state to another. To be more accurate, the term we use to refer to events in state machines is a transition, since we are transitioning from state to state. Transitions can have one or multiple initial states, but only one final state. Note that even though the same states are involved in different transitions, the direction of the event defines a completely new transition.
Now let’s extrapolate this to a tech world example. Think of a basic online shopping cart where the order life cycle can be:
- Ordered state: Order is confirmed by the user
- Payment accepted state: Order payment has been accepted
- Payment declined state: User’s payment method was rejected
- Shipped state: The order has been delivered to the user
Great, now what are some valid transitions for this model? Let’s first consider the business logic: by default, when an order is created, it should transition to the ordered state. If the payment is accepted, the order can transition to the payment accepted state. It is logical that after an order has been paid, it cannot go back to the ordered state. It would be the same as if you’d forgotten that the customer has already paid for his order, which doesn’t make any sense, and would certainly not make the customer happy.
So how do we prevent an order from transitioning from payment accepted to ordered state again? Here lays the beauty of state machines; we simply don’t give it the option. If we do not declare a transition as a valid transition on our state machine, it simply won’t happen. We’ll have full control.
Take a look at the final orders state machine graph:
Note: It is considered a good practice to have a startup transition, like Order. This way we can control preconditions for the default state, and trigger events before and after the default state is reached.
Down to code
Now let’s move this to code. Here is how the base configuration for our state machine might look:
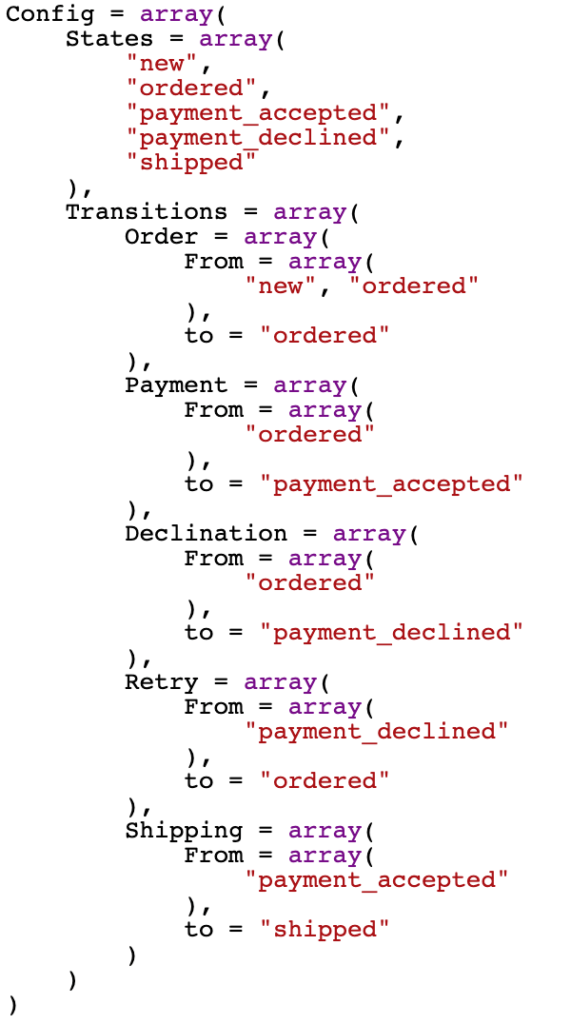
These couple of lines easily explain the business logic, what states are accepted, and what transitions can happen. The state machine would just follow these simple rules, and discard anything out of it.
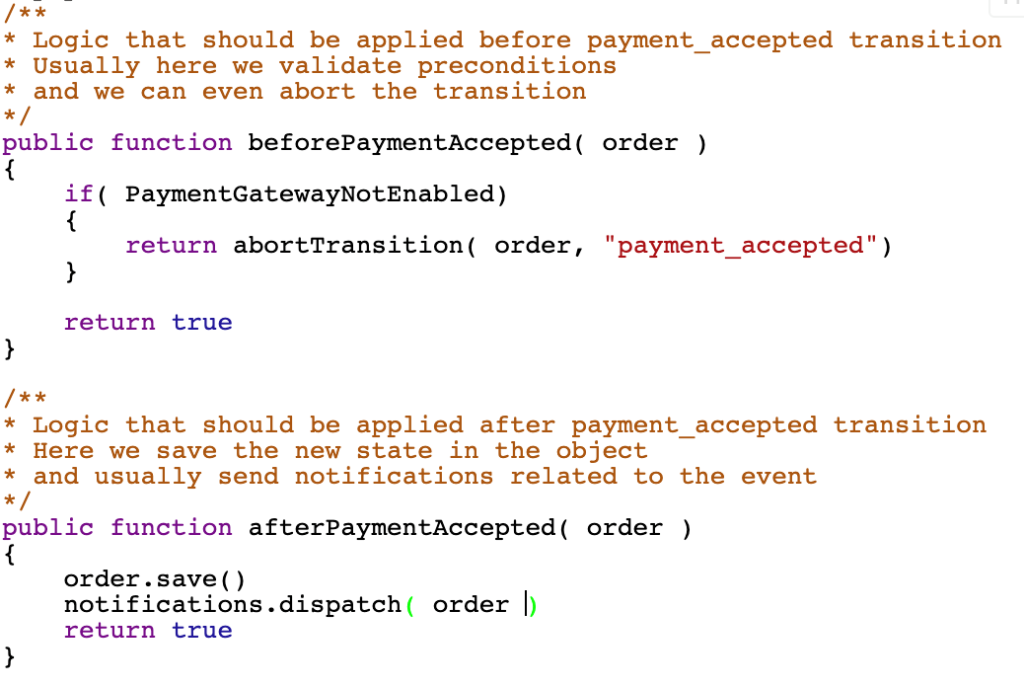
Now, if a program is organized by a state machine, it is easier to spread the logic based on what happens during each transition. On state machine implementations, we usually have before and after callbacks: methods that are auto-invoked before and/or after the transition occurs. They’re usually linked to the state name to which they’re related:
For deeper details on how to code a state machine, take a look at this state machine implementation for PHP.
Advantages
Leonardo Da Vinci famously said “Simplicity is the ultimate sophistication”, and that is part of what we gain by using a state machine on a piece of software. It is really easy to understand, to follow, and to scale, significantly reducing development time and learning curves. At the end, this is time and money saved for a project. From a developer standpoint, code is very well organized and easy to follow. All developers must follow the state machine structure in order to modify it so the code gains standardization and maintainability.
Real Life Usage
Another great illustration of a state machine in the tech space is Android OS. Android uses a state machine to control the lifecycle of its apps:
For Android, each running app is an object with its own state machine. If two apps are running simultaneously, only one is going to have the focus of the screen, meaning it will be on a “Resumed” state, while the other apps will be in “Paused” state. If we want to switch to a paused app, first we need to run the onPause() transition over the Resumed app. This transition can be customized by app developers, but by default, Android will run it to save the data the app is currently using, and to release any resources that were being used by it; a camera for instance. Then, to bring the paused app to life, the onResume() transition is run. Among its tasks, we can find restoring any previously saved data used by the app when it was paused.
Note also that it is not possible to stop a running app without pausing it first. This ensures the app will gently shutdown by running all the maintenance tasks in onPause() and onStop().
GAP Experience
The primary aim of this article is to share with our readers GAP’s experience integrating a state machine on an ongoing project with a telemedicine company to improve the function of their product.
We implemented a state machine in a project for this medical startup which is mainly focused on promoting telemedicine through E-Consults. This company’s product allows a general medical practitioner to ask a question of a specialist by filling out a simple electronic form (the E-Consult) that has to be answered within a defined timeframe (normally 24 hours). The solicited specialist receives a notification about the new E-Consult, and answers the E-Consult (this is called disposition) with instructions for the general practitioner on how to treat the patient, thus eliminating in many cases the need for the patient to have yet another in-person consultation, and consequently reducing associated costs, and drastically shortening timeframes associated with multiple doctors’ visits.
The process is easy to describe, but not that easy to implement. As if they are living entities, software projects usually evolve, mutate and adapt. And that has been the case for this E-Consult app. As our work on the project progressed, we went from a straightforward question-answer model to a complex multi-state workflow full of possible transitions and associated events. Below is a list of just a couple of the variations introduced in the app:
- After a practitioner submits the E-Consult, they can recall it in order to make changes or fix mistakes so they can re-submit it. They can only do this if the E-Consult hasn’t been opened by the specialist yet.
- The specialist has different disposition options:
- Face to face: the patient will require an in-person visit.
- Ok to treat: Send recommendations to treat the patient.
- Wrong specialty: E-Consult needs to be re-routed to another specialty.
- More Info: The specialist requires more information from the practitioner in order to give an accurate answer.
- After the practitioner receives an answer, they can either finalize the E-Consult, or re-route it to a new specialty, or re-submit the E-Consult with additional information. It all depends on the specialist’s answer.
With all this, we went from a code that contained a couple methods to handle the logic to many huge nested methods using more than two thousand lines, full of if this then that else that other thing (which usually contained another if-else statement). And the workflow started looking like this:
We started noticing many methods that were doing the same thing in different areas for slightly different conditions. The app became harder to maintain, and bugs increased. Changes on some methods were not replicated in others that did a similar thing. Customizing a method with a new feature started breaking other scenarios that were handled with the same code. This is where the dev team came up with the idea of a state machine.
Applying the state machine
The first thing we did was sit down and look at the big picture: we needed to come up with a list of states and possible transitions to/from them. From this analysis, we got states and their definitions: New would be the default state of any E-Consult. As I explained above, it is always required. A practitioner can start working in the request, and if it is not ready yet all changes can be Saved. When ready, the practitioner sends an E-Consult for specialist review so it will transition to the Submitted state. This means the E-Consult can now be Opened by a specialist.
This project was built over a Laravel PHP backend. In the framework we installed a vendor that implemented the base state machine functionality. Then we created the workflows/EConsult class where a simple array would hold the entire state machine definition, like this:
Here is where the state machine control starts to take place. We started creating transitions to control the flow. A practitioner can submit a new E-Consult or one that has been saved. But the fact that an E-Consult is in the new/saved state implies that a specialist cannot see it. So, we took advantage of the before callback methods inherent to the state machine to create security checks and make sure that only the right eyes could retrieve a request on a specific state. So now we have specific places dedicated to evaluating simple preconditions for access control management in the E-Consult workflow.
What about dispositioning? When E-Consult is finally in the specialist’s hands, it can take four routes, for different types of dispositions. We noticed that each disposition was doing the same: performing some security checks, changing E-Consult state to the selected disposition, and sending a notification that was pretty much the same for every disposition, except for the disposition name of course. The only problem was, depending on the final state, different routes could be taken: an “ok to treat” E-Consult can be finalized, but if it is a More Info request, it needs to go back to the specialist. To handle this, we came up with a transitional state: dispositioned. The idea is: we get to the transitional state so that all shared tasks are run in a single before/after transition method, and the last task of the after method is to apply another transition to get to the final state (getting this state as a parameter).
When the refactor was finished, we had improvements of over a 40% on code health and maintainability/complexity indexes. We went from a single controller method reaching up to 2000 lines of code, to an independent class with around 500 lines and methods no longer than 20 lines. We witnessed how expanding the lifecycle of an object through the state machine became far less complex, less prone to errors, yielded a lower bug-rate and was generally less time-consuming. As Agent Smith once said: “Never send a human to do a machine’s job”.
Conclusion
State machines are a great design pattern that can be easily integrated with many software projects, whether they are currently out there, or in the first planning steps. Our experience tells us that it is worth the effort of going through a major refactoring in order to acquire all the advantages that come along with a state machine implementation. Sadly, there is no Delorean available to go back in time and rebase a project with a state machine, but at the end, it will be like if you had your very own little Matrix. So, blue pill or red pill?
At Growth Acceleration Partners, we have extensive expertise in many verticals. We can provide your organization with resources in the following areas:
- Software development for cloud and mobile applications
- Data analytics and data science
- Information systems
- Machine learning and artificial intelligence
- Predictive modeling
- QA Automation
If you have any further questions regarding our services, please reach out to us.
About Daniel Obando Fuentes

Daniel Obando Fuentes is a Software Developer at GAP, based in our Costa Rica office. Daniel specializes in Web-based Project Management, Website Planning, Strategy and Functionality, and works with a variety of tech stacks like PHP, HTML, CSS, and Javascript. Formerly, Daniel served as a professor of Systems Engineering at Universidad Católica de Costa Rica. He has a B.S in Computer Engineering from Instituto Tecnologico de Costa Rica, and is a Zend certified PHP engineer. Daniel is a father of two, loves running and playing guitar. Connect with Daniel, or send him an email.